Developing TicToe HTML5/Client-Server communication
Development log of TicToe HTML5
Manually logging in
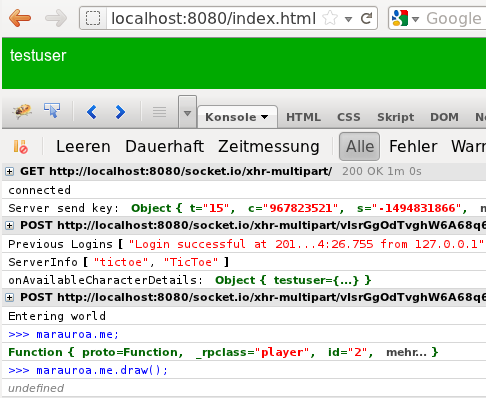
With the server side implemented in the last chapter, we can now actually login. We visit http://localhost:8080/index.html in a web browser and open Firebug. There is an input field at the bottom, that allows you to call any defined method and to inspect any object.
First of all, we need to connect to the server. Type this command and wait for the message "connected" in the console log:
marauroa.clientFramework.connect(null, null);connected
Now we are going to create an account for testing. Please note: The password will be visible since it is just a method parameter. In the finished program there will be an user dialog for the password, with a hidden input field.
marauroa.clientFramework.createAccount("testuser", "password", "test@example.com");Account "testuser" created successfully.
After logging into that account, the server will send us some information, including a list of all character belonging to our account. The default implementation of marauroa.clientFramework.onAvailableCharacterDetails() is quite smart: It will automatically create a character, if there is none. Furthermore it will automatically pick the first one. This behaviour suites out test just fine, we may redefine it at a later stage, through.
marauroa.clientFramework.login("testuser", "password");Previous Logins []ServerInfo ["tictoe", "TicToe"]onAvailableCharacterDetails: Object {}Character "testuser" created successfully.onAvailableCharacterDetails: Object { testuser={...}}Entering world
Inspecting the world
If all goes well, the last message will be "Entering world".
The world is empty at this stage, except for an object that represents our client. We can have a look at the world:
marauroa.currentZoneObject { 2=Function, clear=function()}
There is even a short cut that points directly to the object, that represents our client:
marauroa.meFunction { proto=Function, _rpclass="player", id="2", mehr...}
Do you remember that we have defined a draw() method for the player? Lets call it:.
marauroa.me.draw()
If all went well, the player name will be printed in white in the top left corner of the content area.
Congratulations.
Automating the login
From now on, we will code a little, test a little and repeat. Therefore it is a good idea, to automate the login process.
We add the jquery library and create a new file tictoe.js. So the index.html now says:
<!doctype html>
<html>
<head>
	<title>TicToe</title>
	<style type="text/css">
		body {color: #FFF; font-family: Arial}
	</style>
</head>

<body style="background-color:#0A0">

<script type="text/javascript" src="/socket.io/socket.io.js"></script>
<script type="text/javascript" src="marauroa.compiled.js"></script>

<script type="text/javascript" src="jquery-1.7.1.min.js"></script>
<script type="text/javascript" src="tictoe.js"></script>
<script type="text/javascript" src="tictoe-entities.js"></script>

</body>
</html>
The new file tictoe.js we host the main logic. For now, we just add an event handler for the loading of the page that will connect to the server. And a second handler, that will listen to the onLoginRequired event, and provide a hardcoded set of credentials:
$(document).ready(function() {
	marauroa.clientFramework.connect(null, null);
});

marauroa.clientFramework.onLoginRequired = function() {
	marauroa.clientFramework.login("testuser", "password");
}
{{TODO|drawing: marauroa.rpobjectFactory.entity.set = function(key, value) { this[key] = value; this.draw(); }
}
